Looking to get a general overview of how LiveWhale Calendar is organized? Perfect—you’re in the right spot. We’ll be walking you through the LiveWhale Calendar interface as well as covering some of the basics like the toolbar, logging in, and the dashboard.
Questions we’ll answer in this guide include:
- What does the front-end calendar look like and what visitors will see?
- How do I log in?
- What’s included in the Dashboard and how do I view events?
- What are groups and how do I add users?
- Will I receive notifications from LiveWhale Calendar?
The Front-end Calendar View
Before we log in and start looking at editing interfaces, let’s start with the front-end calendar that site visitors will see. Depending on your school’s theming and customizations, certain elements might be added, hidden, or rearranged, but most LiveWhale Calendars look similar to this out-of-the-box version:

On this main page area you’ll see things like:
- The view selector – navigate between the different calendar views Day, Week, Month, and All Upcoming Events
- Header – a large date header, previous and next buttons, and a jump menu
- Calendar – the primary calendar event display
The sidebar area can include other tools like:
- The mini-calendar – cycle through this interactive month view to easily find a particular date
- Search box – basic keyword search tool
- Subscribe link – an easy spot to grab RSS and iCal links for various calendar feeds
- Event type (Categories, Audience, Campus) filters – clicking on any of these will give a filtered view of events with just those event types
- Tag selector – selecting any of these will also give a filtered view of events with just those tags
- Submit button – for accepting event submissions from your community (learn more info about event submissions)
Event List View
In most views when browsing and searching the calendar, visitors will see a simplified list view of all matching events. By default, each event will include title, time, location, summary, and image. These are customizable in the theming process. Clicking the event title will bring you to the event details view.

Event Details View

The main content area will show by default:
- Your event summary, usually in a larger font
- The rest of your event description, including any inline images and video
- Event cost
- Tags
- RSVP form (if enabled)
- Add to my calendar link to download an iCal file that can be imported into Google Calendar, Outlook, etc.
The event details sidebar includes:
- The event image, or a link to a fullscreen slideshow if multiple images have been added
- Location map
- Online event link (if enabled)
- Contact info
- Social media sharing links
Note: Events with title/date only and no “beneath the fold” details may not have an event details page but will still appear in the main calendar views with no link.
Logging into LiveWhale
The login page for LiveWhale Calendar is almost always the URL of your calendar plus /livewhale/. So, if your calendar is located at calendar.yoursite.edu, you can log into LiveWhale at calendar.yoursite.edu/livewhale. Many schools choose to put an “Editor Login” link into their calendar theming, in the footer or elsewhere.
LiveWhale comes first installed with a default “password” mode, which allows you to create username/password pairs. However, most schools configure a connection to their single-sign-on (SSO) server, so calendar managers can log in using their normal credentials. In most cases, visiting the /livewhale/ login URL will first redirect you to your university SSO login page, and then back to LiveWhale upon a successful login.
The LiveWhale Toolbar
Once you’re logged in, you’ll see the LiveWhale toolbar at the top of your browser. It will look like this:

Across that toolbar you’ll see the following:
- Your Group: brings you back to the editor tools
- Your Events: brings you to your group’s event manager
- Go to Calendar: brings you to the main calendar for your school, or your group’s calendar, if one is configured
- + New: a button to take you directly to adding a new event at anytime
- Toolbox (more on that later…) add anchor link down to that section
- Hi {Name}: a link to your User Settings (there’s more info on that here; add anchor link down to that section) and a Log Out link
The Back-end of LiveWhale: The Dashboard
The Toolbox
The Toolbox contains your events, RSVPs, images, locations, and more. This section contains most of the links in the toolbar, plus more if you have the permissions to see them. Here’s what it looks like for a typical admin calendar user:
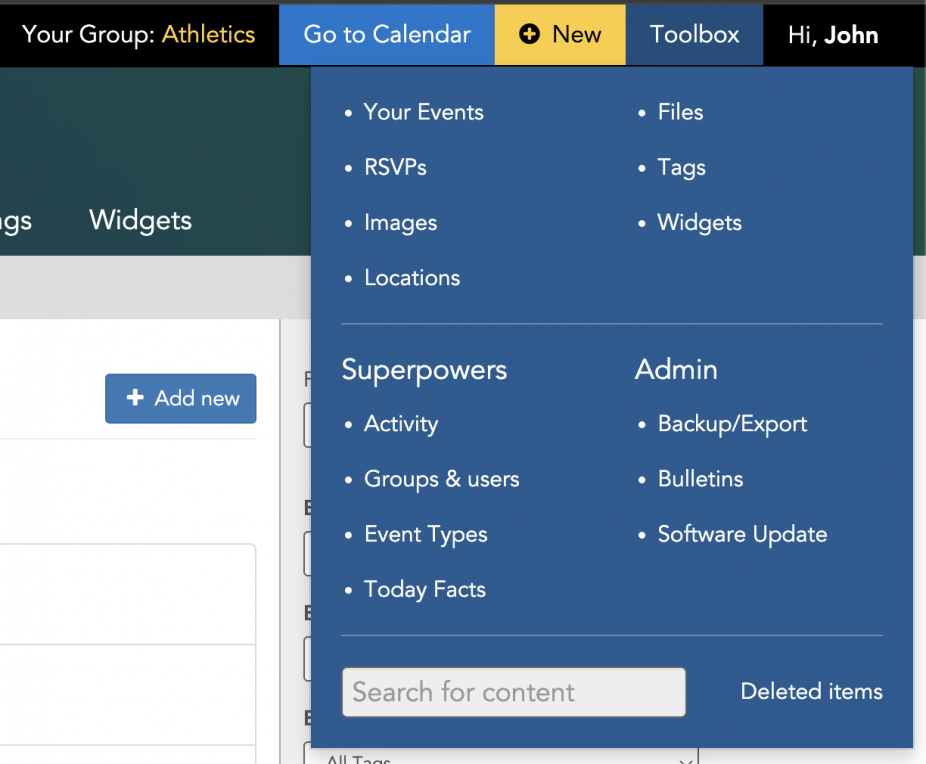
- Activity: shows an activity log summary of edits in LiveWhale from users
- Groups & Users: A list of all groups and users that have been added to LiveWhale
- Event Types: A list of categories shared by all your groups and users and is used to help organize your events
- Today Facts: A special kind of blurb content in LiveWhale and that displays interesting facts about today’s date on your calendar and can be customized to display important facts related to your campus too
- Backup/Export: This is your data that’s stored and can be exported
- Bulletins: This is where you can add notifications to your LiveWhale editors
- Software update: A quick link to the LiveWhale upgrade screen.
Groups, Users and Permissions
When you login, the first thing you’re going to see are events from your group.
Groups are the main organizing principle of LiveWhale – you might think of groups as “buckets” of events, and the users that manage those events. One key idea is that in LiveWhale, everything is owned by a group: you as an individual user don’t “own” any events, images, tags, etc. This is so that even as new users arrive, change groups, or depart, there’s never going to be content that becomes inaccessible.
Groups tend to correspond to offices and departments on campus – Department of Biology, Department of Music, Student Services, Registrar – but also can sometimes correspond to special communications efforts, like the homepage or a “Featured Events” group.
When a user logs in to LiveWhale, they’ll see and be able to edit all the events in their group. Users can be a member of one or more groups. Administrators have access to every group.
Permissions
User permission options fall into several levels for LiveWhale Calendar and include: Editor, Publisher, Curator and Administrator. More specific information about each of those levels can be found linked in our docs below.
Importing groups and users
You can import your groups and users all at once by creating a CSV file with specific formatting, and passing that file to us for back-end importing. We can also provide the formatting requirements and a starter spreadsheet if needed.
Group switching

If there are certain groups your editors use frequently (for instance, the Homepage, Newsroom, or Marketing groups) you can configure those to appear at the top of the list.
More in the docs:
User settings
To change your password (when you’re using LWC’s built-in authentication model), email address, or notification preferences, click the “User settings” link in the user menu at top left. There are some optional developer settings here as well.
Sharing
Sharing is one of the fundamental features of LiveWhale. By sharing your events with other LiveWhale Calendar groups, you can promote your events in more places, to more people. There are a lot of ways sharing and reusing content is encouraged on the LiveWhale platform, but the most central kind of sharing is between calendar groups.
Users who are posting events that they’d like to promote on other groups’ calendars mark their events as shared and users who are looking for events to add to their calendar can search for shared events.
Marking events as shared
The globe icon designates that an item is “shared.” That means other users can find it and add it to their own calendars. Events are shared by default, but you can click the globe to toggle sharing on and off.

Suggesting to other groups
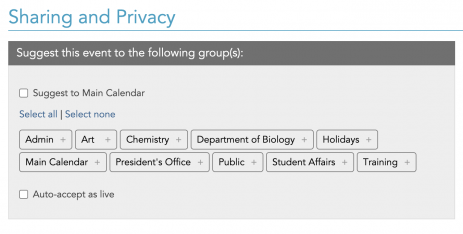
To suggest an event to another group, add them from this field on the event editor page. You can select the group(s) you’d like to suggest your event to. Admins have a special option to “Auto-accept as live” to bypass approval and automatically accept them to groups.
Accepting shared events
When you suggest an event to a group, they’ll get an email notification, and they’ll have a notice like this at the top of their events list:

Simply click “Accept as live” to include it on your calendar.
Searching and Filtering
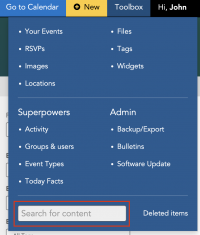
To search for events, use the search function in the toolbar dropdown. You can search by things like an event title, a keyword, or event an event id to search your calendar for events. That will take you to a search results page showing your events.
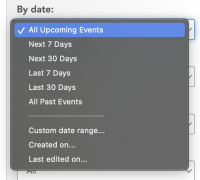
When filtering events in the back-end the default date view will show you “All Upcoming Events”—you can use the dropdown to search other things like “All Past Events” or a “Custom date range” and more.
Additionally, you can filter by options like event type, tag, status, visibility, group, location, and sort however you need.
Bulk Actions
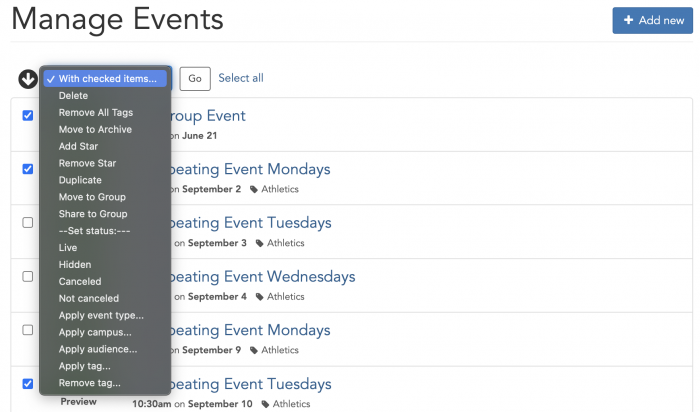
In LiveWhale you can perform bulk actions for certain things—no need to do it one by one. For example, this is helpful when you need to make all events “Live” or “Hidden”, if you want to star/unstar many events at once, add or remove tags, move events to another group or share events with another group.
We make it easy—just check off the events you need from the event manager and using the dropdown list choose what option best suits your needs. It looks like this in the dashboard:
Email Notifications
We try to make it a habit not to send lots of notifications your way, but there are some instances where you may want to be notified of certain things. If you attach an email address to your LiveWhale user, LiveWhale will send you email notifications about activity you’ve asked to be notified of like:
- Event RSVP notifications
- Suggested content to your group(s)
- Bulletins (messages from administrators)
More in the docs:
 LiveWhale Support