Once you’ve got your calendar set up and full of events, why limit all that rich information only to the main calendar page? Instead, you’ll want it flowing across the rest of your online presence—to your homepage, department pages, digital screens, a mobile app, etc.
LiveWhale has two robust tools for helping you do just that: the widget editor and our API.
Questions we’ll answer in this guide include:
- What is a widget? How do I create one?
- How can I customize widgets to display exactly what I want?
- What options do I have for reusing widgets on different web pages?
- Can I see some example widgets?
- What if our developers prefer to use the API? How will we set that up?
Widgets
What is a widget? Because widgets are such versatile and useful tools in LiveWhale, it was impossible to find a name that accurately reflected everything they are and can do. So, “widget” was the best we could do.
Basically, a widget is a collection of settings (“get me events meeting these criteria…”) and formatting options (“…and display them this way”).
The end result is a simple copy-and-paste code snippet that you can embed on any webpage, regardless of your CMS. Once embedded, it will automatically update to show the most up-to-date results without any additional work. It’s similar to something your developers could build from scratch using our API (more on that below), but the widget tool can save you a lot of time.
Creating and editing your first widget
To view your list of saved widgets, login and go to “Widgets > Your Widgets” under the LiveWhale Calendar toolbox or main navigation. This will show saved widgets in your group.
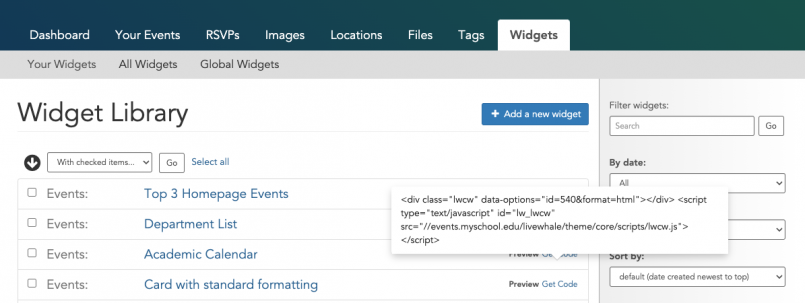
You can click a widget name to edit it, or “Get Code” to get copy/paste code.
Click the blue “+ Add a new widget” button to start creating your first widget.
Note: Only users with the Curator or Admin permission level have access to create and edit widgets. But, depending on your approach, not everyone needs to create their own widgets. We’ll talk more about reusing widgets a bit later.
The Widget Editor

The main areas of the widget editor screen are:
- Title (*required) – This name is internal only, and won’t be published with the widget results.
- Description – Add an optional description to your widget to help you remember what it’s used for.
- Template – More on this below (Widget Templates)
- Widget preview – This shows an unstyled preview of the current widget results. You can add preview styles to your global themes widgets.less/scss/css file if you like.
- Generated widget syntax – You likely won’t need to use this, but it can be a neat way to learn the system names for your widget settings, especially as they pertain to re-using widgets or the API (below).
- Save this widget
And then, the options… when you first open the widget editor, you’ll be confronted with an enormous list of options (screenshot). The widget tool lets you filter events by number, date, tag, type, group, search terms—just about anything you can imagine. Fear not: we’ll step through the basics you need to know here, and you can always dig deeper into the widget options if you want to get more advanced.
Common widget settings
When you’re placing a widget on a page, usually you’ll be looking for something different than a list of all the events in your calendar; most commonly you’ll be limiting the display of events by group, event type, or tag.
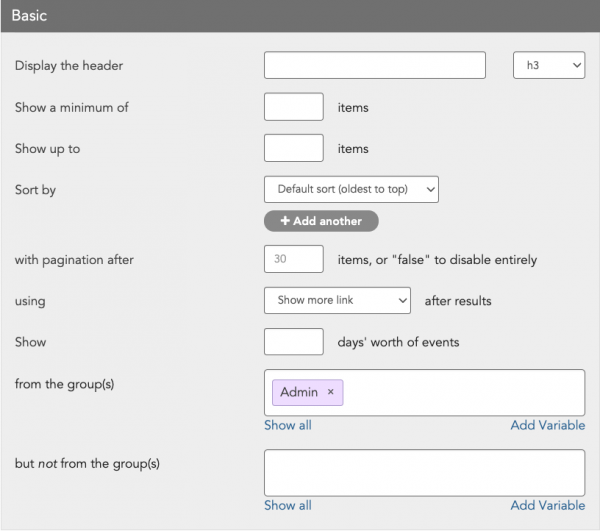
Groups
By default, the editor will filter for events from your current group. You can delete (click the “x” next to the group name) and leave that setting empty to get events from all groups. This might work best in conjunction with other filters like tag. You can also show or exclude events from one or more specific groups.
Many schools will create a special group like “Featured Events” or “Homepage” where editors can suggest events. Then, a central team can accept the shared event suggestions and use a widget to display those events on your main homepage or other visible spots.
Dates
By default, a widget will always show current and upcoming events. But, you might want to customize a widget to show specific start and end dates. These can be absolute dates, like the start and end of a conference.
Or, you can use relative dates like “last August 1”, “this December 15”, “-1 week”, or “+2 months” to show the current semester or any other block of time. This is common for widgets showing registrar deadlines and academic calendar events.
Number of events
Setting a max (“Show up to ____”) is a good idea for just about every widget. You can also paginate results to avoid loading an extra-long list of events on first glance.
The min (“Show a minimum of ___”) is a bit tricker—if you set min=3, the widget will only show results at all if there are at least 3 events meeting your criteria. So if only two events would show up and you have min=3, the widget will be empty and return nothing. This is intended for widgets with a more strict design, such as a homepage element that only looks right with three featured events.
Tags and Event Types
Filtering by tag or event type can be a great way to show relevant results from across multiple groups. For example, a widget with tag=Reunion can be placed on the reunion webpage, or type=Student for the student portal.
These options are great to keep in mind as you build out your own content strategy and train users (e.g., “We placed a widget on the Diversity homepage, so tag your events Diversity to have them show up there.”).
Stars
Farther down, you’ll find the option “Only show starred items?” Setting this to Yes will only include starred events in the results, which is one way you can give individual publishers some curatorial control over how their events appear. For instance, maybe your department homepages have a widget showing “the next three starred events” and then on another page you have a simpler list showing all upcoming events.
Widget Formatting
Once you’ve got your criteria for selecting which events will appear, then you can choose how to display them using any HTML markup you need. Since widget results get injected directly into the markup of your page, you’ll want to consider using HTML tags and classes that will work well with your site-wide styling. (Though, if you need to, you can also bundle CSS with your widget embeds, more on that below.)
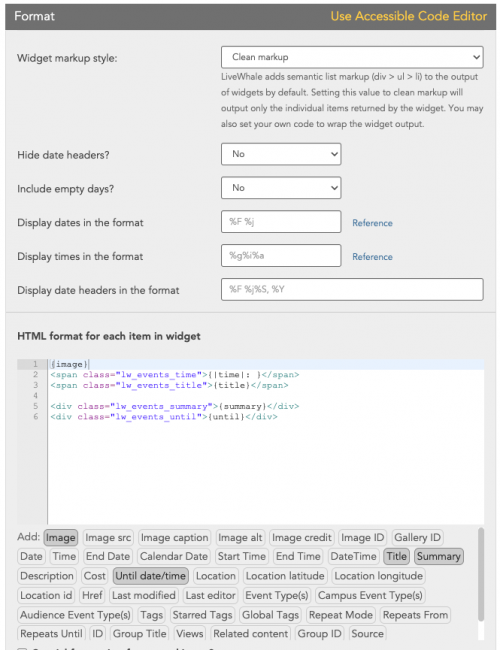
The main area you’ll want to focus on when formatting is the code editor “HTML format for each item in widget.” As it says, this will contains the markup that the calendar will output for each event in your widget. You can write any markup here that you want, and include the event variables in {curly brackets}.
All the event variables can be added by clicking the shortcut links under that box— date, time, description, and so forth.
For a simple example, if you wanted your event list to look like this:
Office Christmas Party
December 5th, 2024
8:00pm
Tagged: super fun, good times
Lunch with Santa
December 8th, 2024
12:00pm
…. then you’d be looking for markup similar to this:
<h4><a href="...">Office Christmas Party</a></h4>
<p class=”date”>
December 5th, 2017<br/>
8:00pm<br/>
Tagged: <em>super fun, good times</em>
</p>
<h4><a href="...">Lunch with Santa</a></h4>
<p class=”date”>
December 8th, 2017<br/>
12:00pm
</p>
… which means your format argument would look like this:
<h4>{title}</h4>
<p class="date">{date}<br/>
{time}<br/>
{Tagged: |tags|}
</p>
Simple, right?
Formatting tips
- You’ll notice certain variables like {title} and {image} have their output pre-wrapped with a link to the event if the event has a description or other details beneath the fold. You can bypass this by using {title_clean} or {image_clean} – in fact, the _clean suffix will strip HTML from any other formatting variable, if you need.
- As you can see with the “Tagged:” section, there’s syntax for showing content only if a variable exists:
There’s way more to learn about Conditional Widget Formatting if you want to get more advanced.{ Only output this content if |this-variable| exists.} - You can change the date formatting site-wide to AP style, or per-widget by using the date and time formatting options.
- {cal_date} is a special variable that outputs the date in this kind of format:
which you can style with CSS into something like this:<div class="cal_date"> <div class="cal_date_month">Mar</div> <div class="cal_date_day">27</div> </div>
- Beneath the per-result formatting editor, there’s also a place to indicate HTML that you want to use once to wrap all of your widget results:

Working with event images
Plenty of useful widgets can be text-only, but the most appealing events have great images, and we want to include those images in some of our widgets using the {image} formatting variable. There are a number of settings to customize the dimensions and crop of that image output, as well as options for only showing results that have images (say, for a large homepage feature that only looks right with images for each event).
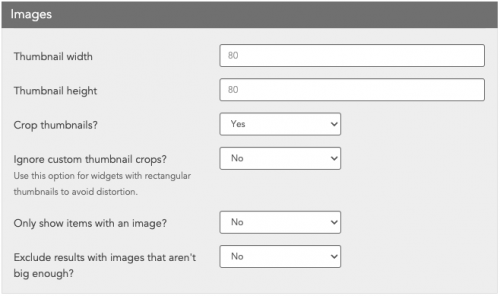
Remember, you can also set default images per-group or per-feed for Linked Calendars. If you like, you can even use Advanced Conditional Logic to set a fallback image within your widget format (i.e., “if/else” logic for “if event has an image, show it, otherwise show this fallback image”).
Embedding a widget on your website
You did it! You customized your widget to exactly how you want it to look, and what events it should pull, and you’re ready to embed it on your website.
First save the widget, and use the Get Code tool from the widget manager to grab the copy-and-paste code:

It will look something like this:
<div class="lwcw" data-options="id=540&format=html"></div>
<script type="text/javascript" id="lw_lwcw" src="//events.myschool.edu/livewhale/theme/core/scripts/lwcw.js"></script>
You can paste that directly into your CMS.
Note, if you want to embed multiple widgets onto a single page, the script tag can be pasted as many times as you need, but it only needs to be loaded once—it will apply to every div class=”lwcw” on the page.
Reusing widgets
There’s no limit to the number of LiveWhale Calendar widgets you can create—however, there may be cases where you find it more efficient to re-use one saved widget rather than creating many copies. In those cases, you can alter certain criteria inline without having to make a whole new widget.
In your widget code, find the string that looks like data-options=”id=123&format=html”. You can add almost any widget setting to that data-options string separated by ampersands. For example,
- data-options=”id=123&format=html&group=Music“
- data-options=”id=123&format=html&category=Performances&exclude_tag=Private“
- data-options=”id=123&format=html&start_date=2024-01-01“
- data-options=”id=123&format=html&tag=soccer|hockey|basketball“ (use | to separate multiple values)
You could use this to divide up the results of a single widget by date:
<h3>2023 Events</h3>
<div class="lwcw" data-options="id=123&format=html&start_date=2023-01-01&end_date=2023-12-31"></div>
<h3>2012 Events</h3>
<div class="lwcw" data-options="id=123&format=html&start_date=2022-01-01&end_date=2022-12-31"></div>
Note: Use the date format YYYY-MM-DD when providing start_date and end_date to avoid ambiguity. More about start_date and end_date formatting here.
Or you can use one saved widget across many different pages and groups:
<div class="lwcw" data-options="id=123&format=html&group=Academic Calendar"></div>
<div class="lwcw" data-options="id=123&format=html&group=Biology"></div>
<div class="lwcw" data-options="id=123&format=html&group=Chemistry"></div>
Using the above options, a number of LiveWhale Calendar schools choose to simply make one or two global widgets (a list view and a “featured” card view, say) and then add components to their main site CMS that lets editors select a widget style and filter by their chosen group or tag without ever having to copy/paste the HTML manually.
Tip: Embedding CSS with your widget
Our recommended best-practice is to set up your widget HTML formatting to use whatever CSS classes are already on your site. Remember, the resulting HTML from LiveWhale Calendar widgets gets injected directly into the page of your site (it’s not an iframe), so it should already hopefully look pretty good with your site-wide styles.
However, if your widget needs custom styles and it’s not possible to add them to your site-wide CSS, you can add styles to /_ingredients/themes/global/styles/widgets.less (or .scss or .css) in your global theme. The resulting CSS file will get loaded alongside the widget HTML when your widget is embedded. Just make sure to define and namespace your CSS carefully, otherwise you may end up affecting other page styles outside of your widget.
Tip: Embedding a widget on your calendar site
The copy/paste HTML and JS provided from the widget manager will also work if you’re trying to add a widget to your calendar site—say, a featured events widget for the top of your calendar design, or an additional widget in the calendar sidebar showing particular events. However, you can also bypass the HTML/JS solution and simply insert the saved widget via ID using markup like this:
<!– This will display widget 55 in your calendar theming –>
<widget id="55" />
Widget Templates
If you find yourself creating multiple widgets with similar settings or formatting, you can instead save individual Widget Templates via SFTP in your _ingredients/ folder to make some of that work easier.
You can create a widget template using this empty template and pasting in <arg id=”…”>…</arg> settings from the widget editor’s Generated widget syntax panel.
<widget type="template">
    <title>My Widget Template</title>
    <args>
        [SETTINGS PASTED FROM WIDGET EDITOR HERE]
    </args>
</widget>
For example, here’s some settings and HTML you might use for a three-column event widget:
<widget type="template">
    <title>My Widget Template</title>
    <args>
        <arg id="max">3</arg>
        <arg id="format">
                <div class="event">
                                {<div class="event_image">|image_clean|</div>}
                                <div class="event_info">
                                        <div class="date">{date}</div>
                                        <h3 class="title">{title}</h3>
                                        {time}
                                        {summary}
                                </div>
                        </div>
                </arg>
                <arg id="format_widget">
                        <div class="events-3col">
                                {widget}
                        </div>
                </arg>
    </args>
</widget>
If you save that file as /_ingredients/templates/widgets/events.my-widget-template.xml, then “My Widget Template” will appear in the Template dropdown of the widget editor.
Once you’ve selected a widget template, its settings will be applied. If you later edit the widget template XML file on the server, any widgets using it will auto-update with the changed settings.
Overriding widget template settings
After you’ve applied a template to your widget, you can still customize or override template settings on a per-widget basis.
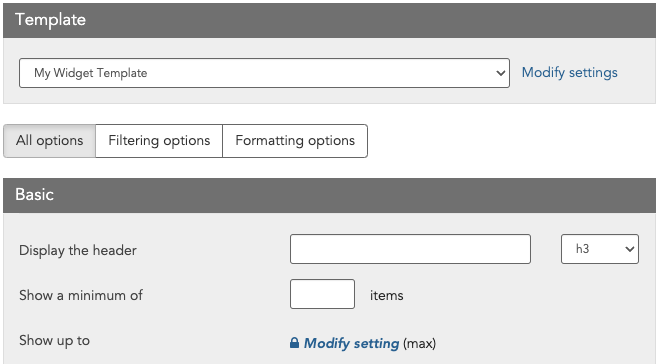
There are two ways to do this in the widget editor:
- Via the “Modify settings” link in the top Template section – this will open a list of all the settings (except for HTML formatting) being applied to the widget, and you can un-check them to restore default values.
- Or, in the widget editor there are individual “Modify setting” links with padlock icons that you can use to “unlock” the widget template setting and choose a new value. (HTML formatting you always override in the inline editor.)
Remember, if you need to you can also override settings when you insert a widget onto your page by extending the data-options string (e.g. data-options=”id=123&max=5”).
Editing the default widget template
Every LiveWhale installation comes bundled with a set of default widget templates that get used whenever a new widget is being created.
The default events widget template is at public_html/livewhale/templates/widgets/events.default.xml.
You can leave that template as-is, or you can copy it into your _ingredients folder (saving it as public_html/_ingredients/templates/widgets/events.default.xml) and customize it, if you want users to always be starting with some standardized settings and formatting when creating a new widget.
Example starter widgets
For the most seamless look-and-feel we recommend creating your own widget templates with HTML that matches the rest of your site. To get you started, though, here are some basic widget templates you might consider using as models.
List View
You can never go wrong with a simple list of events—this style of widget is popular for inner website pages, academic department page sidebars, and other places where a concise list of upcoming events is more important than something highly designed.

Card View
This style of events widget has gotten increasingly popular, especially for calendars with lots of great event images. The starter template shows up to three events, but you can adjust it to show more or less, or to use design elements matching the rest of your site.

Featured Events
Many LiveWhale Calendar schools use some version of this three-across design for their .edu homepage or the main calendar homepage.

The LiveWhale API
LiveWhale Calendar has a REST API for extracting event info and using it in other applications. This is useful for when you’re plugging into a third-party service, or if you’re a developer and you want to build your own integration without using the above widget tools.
The available output formats are JSON, RSS, and iCal.
To get started, simply visit /live/rss/events or /live/json/events from your browser. You’ll see a starter set of events results right away.
Example: /live/json/events
{
        "meta": {
                "type": "events",
                "total_results": 1405,
                "per_page": 100,
                "page": 1,
                "total_pages": 15,
                "response_fields": [],
                "supported_fields": [
                        "event_types",
                        "location",
                        "tags",
                        "image",
                        "summary",
                        "description",
                        "contact_info",
                        "registration",
                        "last_modified",
                        "group_title",
                        "custom_fields"
                ],
                "response_time": 0.26
        },
        "links": {
                "self": "https://events.myschool.edu/live/json/events",
                "first": "https://events.myschool.edu/live/json/events?page=1",
                "prev": null,
                "next": "https://events.myschool.edu/live/json/events?page=2",
                "last": "https://events.myschool.edu/live/json/events?page=15"
        },
        "data": [
                ALL OF YOUR UPCOMING EVENTS...
        ]
}
The LiveWhale JSON response is divided into three section, based on principles from the JSON API spec.
- “meta” tells you information about your request, how many events were returned, pagination options, what additional fields you can request to get more info, and how long the request took.
- “links” includes more detailed information about pagination.
- “data” is an array of objects, each object corresponding to one event record
(Note, if you don’t see “data” and simply see an array of objects, this means you are on the older version of the JSON API and should look into upgrading.)
Detailed information about customizing and parsing your API results is available in the documentation.
Here are a few tips to get started:
-
Every LiveWhale widget setting has a corresponding REST API format. Usually it’s simply /setting_name/setting_value. So, if you see <arg id=”group”>Music Department</arg> in the widget editor, you can accomplish the same thing via the API using /group/Music Department/. You can URL-encode to get /group/Music%20Department/, that also works.
- The only exception is the HTML formatting options: since you’re getting the raw API data, you’re on your own to assemble your events into display code. That’s one of the main time-savers from using the widget editor.
- Use as many settings as you want: since the API is REST-ful, you can chain together multiple settings, like /live/json/events/max/3/group/Featured Events/thumb_width/300/thumb_height/300 etc.
- Remember, all LiveWhale widgets and the API show upcoming events by default. Experiment with adding a /start_date/2024-01-01 or /start_date/-4 weeks to see past results.
- By default, LiveWhale will separate out multi-day and repeating events so your API results are threaded chronologically, with one copy of each event per-day. Often times, you may want to consolidate those event series: use /hide_repeats/true/ in your request to accomplish that.
And some common pitfalls to avoid:
- The LiveWhale API does support authenticated requests, but we recommend most teams focus on integrations displaying public events visible to everyone, which don’t require any special settings.
- Only request what you’re going to use: to keep your calendar server performing well, only pull as much information as you’re planning to display, using things like /max/5 and the /requested_fields/ settings. Also, for high-traffic integrations we strongly recommend you cache API responses for at least 5min and up to 60min—while LiveWhale does do its own caching, popular web pages that make a new /live/json/events request every time someone visits are not recommended.
You can continue learning more about the ins-and-outs of the LiveWhale API in the documentation, and swap tips and questions with other developers in the forum. Happy integrating!
 LiveWhale Support