Any time you create a new page in LiveWhale, you’ll be creating it from a template.
As long as you edit that page only through the LiveWhale editor (i.e., without editing the page source directly via SFTP or the now-deprecated “Edit Source” button), that page will remain attached to the template and can receive updates from that template any time you choose.
Creating a new page template
Only two things are needed to take any PHP/HTML page and transform it into a LiveWhale template: first, make sure the file starts with:
<?php require $_SERVER['DOCUMENT_ROOT'].'/livewhale/frontend.php';?>
And make sure it has at least one content area with class="editable".
Now that your file is ready to go, upload it to your site under /_ingredients/templates. We like to organize our templates directory into subfolders like /general for normal web pages, /details for details pages, and /includes for things like header and footer files.
Pages in /_ingredients/templates (and its subdirectories) are automatically detected and added as available templates in LiveWhale. There’s no need for any additional steps to mark a page as a template. (Existing templates will still show the checkbox so you can remove it if desired.) Long-term, we recommend migrating your page templates into /_ingredients/templates.
LiveWhale checks for new templates when you visit the Templates manager. So, if you’ve added a new template recently, visit /livewhale/?pages_templates (Toolbox > Superpowers > Templates) to make sure it gets added to the list, or to see any errors associated with the template.
NOTE: If a page is not valid XHTML, it cannot be used as a template. In such cases, a warning will be displayed, preventing you from checking the template checkbox. This is designed to guard against XHTML markup errors spreading throughout the site. In most cases the errors can be easily resolved. Click the “Why?” link next to “Page is not valid XHTML” to view the errors that must be fixed before the page can be marked as a template.
Finally, do note that templates which might be shared for multiple LiveWhale hosts must be marked as templates on every host for which you’d like them to be available.
Defining editable areas of a page template
Each editable area must have a unique ID and class=”editable”. You can also include “optional” as a CSS class for areas that should appear when editing (even if empty), but will be hidden on publish if they don’t have content.
<div id="sidebar-upper" class="editable optional"></div>Any optional editable area that is empty when publishing will be hidden with an automatically added class=”lw_hidden.” Additionally, a body class will be added to indicate that the area is hidden (e.g., sidebar-upper_hidden). You can use those body CSS classes in case your page layout needs larger structural changes when certain areas are shown/hidden.
In LiveWhale 2.17.0 and later, you can also add data-image-size to the editable area to lock the width/height of WYSIWYG images inserted via the page editor. This was previously available as part of Content Layouts, but in 2.17.0+ you can apply to the top-level editable element:
<div id="hero-image" class="editable" data-image-size="600x300"></div>In LiveWhale 2.20.0 and later, you can use auto width or height in your data-image-size declarations:
<div id="hero-image" class="editable" data-image-size="600xauto"></div>
<div id="vertical-image" class="editable" data-image-size="autox450"></div>
Detecting templates for existing pages
If you add a page to your site from outside of LiveWhale (e.g., by uploading it via SFTP),
LiveWhale will attempt to match it up to an existing template by analyzing its markup. In this template-matching process, LiveWhale only considers content outside of editables, excluding the <title /> and <meta /> values for the page description and keywords, which naturally vary page-to-page. Thus, if you’re trying to make a new template from an existing one, you must make any markup changes first or LiveWhale will associate it with the existing template. (Adding a hard-coded body class should be sufficient if nothing else.)
Changing a page’s template
Once a page has been created from a particular template, it is possible to change the template at a later time. Content inside editable regions will be preserved, but the outer content of that page will be switched to the new template’s content.
In order to perform this change, you must be logged in as a user authorized for page creation and deletion.
- From the LiveWhale interface, click the “Pages” tab. (If the Pages tab does not appear, the administrator has not assigned page editing permissions to you.)
- If the page you’re looking for is in a navigation, click its title to view the page details screen. Otherwise, click the “File Browser” submenu, navigate to the page’s directory, and then click the name of the page.
- On the page details screen, find the section “Template information” on the righthand side. If this page is currently using a template, it will be listed here. To change the currently used template, click the “Choose a different template…” link. Select the desired template from the template chooser.
- If the newly chosen template does not define the same editable regions as the current one does, you will be asked to map content from the first template’s editable regions to the second. Use the supplied drop-down menus to do this.
- To preview your content in the new template, click “Preview these changes”.
- Click “Save these changes”.
Reassign page templates in bulk
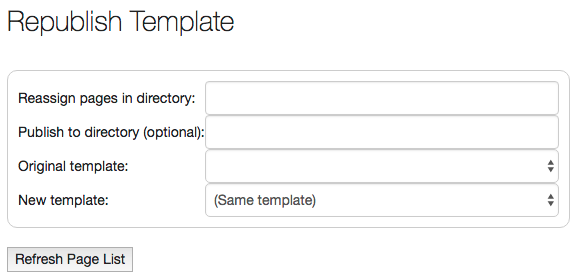
You can reassign page template to directories and have more flexibility switching page templates. Do this using the “Reassign Page Templates” tool under the “Templates” superpower.

- Enter the directory to reassign a template to in the Reassign pages in directory field
- Select the Original template that your pages are currently using.
- If you want to reassign pages set to Any template, all pages will be set to the new template selected.
- If you want to assign a template to pages that DO NOT have a template assigned to them, select No template.
- If you want to switch out a template currently in use, select the template from the list.
- Select the New template in the list to assign to your pages
- Optional: You can publish the changes to go a different directory by entering the destination directory under the Publish to directory field. This can be helpful for testing purposes.
Republishing a page template
You may want to update a page template and then have those changes flow out to every page using that template.
- Login to your LiveWhale interface
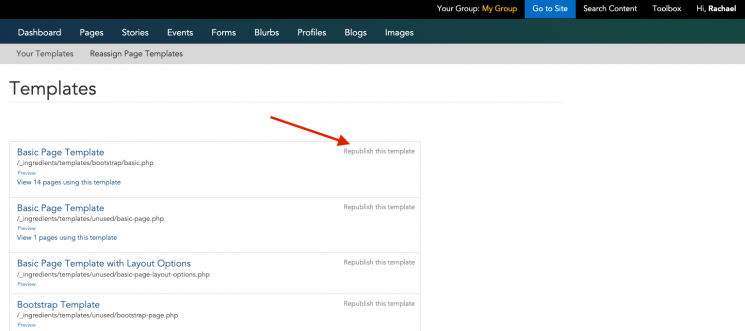
- If you are an administrator, click the Templates link in your superpowers toolbar
- Make any changes to your template. One way you can do this is by clicking the template name and click edit this page, then click Edit Source make your changes and then Save and publish.
- To push your changes to your template’s child page click Republish this template

What you should know about republishing templates
- Placeholder content will not be pushed to your child pages, only new pages created from the template will contain placeholder content. This is a safety feature, in which only the new editable regions
<div>will push to child pages but not the placeholder content inside them. - The homepage is a special case and will not be affected by the republishing of templates feature. This feature is to eliminate any accidents of pushing content to the homepage.
- If you want to push out content to your child pages you may insert content outside the editable regions. For example, if you want to push a widget to all of your child pages, add the widget outside of the “editable” sections and your widget will be pushed to all of your child pages after you click “Republish this template”.
Setting template permissions
As an admin, you can see all templates, but users can only see select templates based on where the templates are located in your site, or when you explicitly give them access via a group to which they belong or their user account.
Here’s how that works:
- In your main LiveWhale config.php file, you set an array of paths to folders containing templates you want to make available to everyone on that host. (Yes, it’s set-able per-host.) /templates is already authorized by default, but you may add others as desired to
'GLOBAL_TEMPLATES'=>['/my-template-folder'],in the core/config.php file. - Every group can see templates stored inside their group directory or those you set when editing the group. (See below.) All users in that group, or users able to switch to that group are able to use those templates.
- Finally, you can set custom template paths when editing a user, to give them explicit access to a specific template regardless of their other template access.
To assign permissions for groups/users to access certain templates, follow these steps.
- Go to the Groups page
- To set template permissions, select the group or user.
- Locate the Template Permissions section on the group or user edit page.
- Under “Add template for site…”, enter the path you wish to authorize a template for and click the “Add” button.
- For example, “_ingredients/templates/department/landing.php” or “_ingredients/templates/department”. If a directory path is used, template access permissions will be recursively available for all pages beneath that directory path.
- Click “Save” to save changes
Bypassing the global theme in your pages or templates
By default, every page in LiveWhale uses assets from the “global” theme. However, you might have certain special pages in your site where you don’t want to use your site-wide fonts or styles. Since LiveWhale 1.6.2, you can now do this by adding the following to your page or template:
<xphp var="exclude_global">true</xphp> LiveWhale Support