Ready to get all your amazing events into LiveWhale? Let’s do it! It’s easy to add events natively within LiveWhale, accept submissions from others in your community, or bring in events from outside sources so everything is linked centrally in one place.
Questions we’ll answer in this guide include:
- How do calendar managers enter events? What options are there?
- How can you import and sync events from other calendar services?
- Can non-managers submit events? What’s the approval process like?
Using the LiveWhale Event Editor
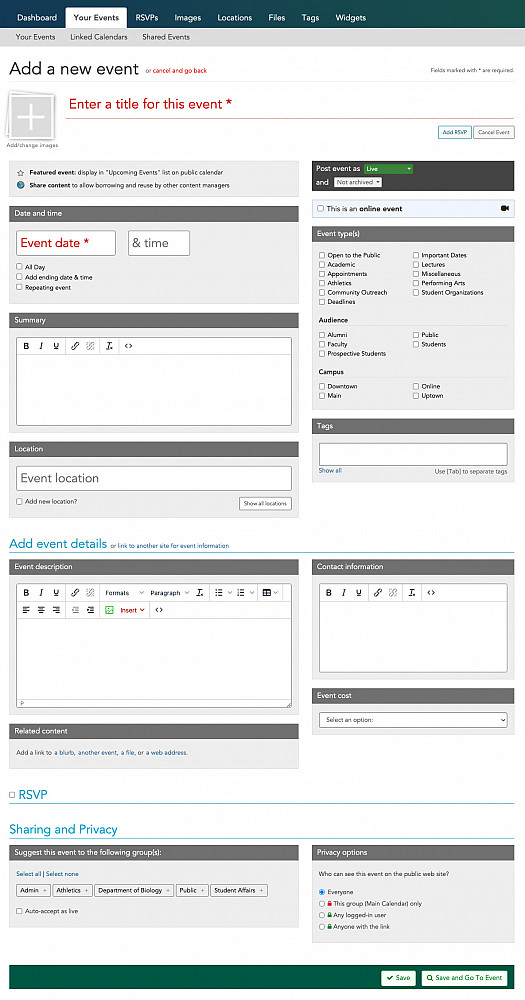
Here’s the LiveWhale event editor. It may seem like a lot, but trust us, entering an event can be as simple as you like, or include as many details as you need. To get started, click the blue “+ Add new” button from the events list, and we’ll walk you through each section of the event editor form.
What do you need to fill out?
When it comes to adding events, the only two things that LiveWhale requires are date and title. Calendar administrators can choose to require additional fields, but we don’t usually recommend it—think of an event like “Spring Break” or “Registration Week.” You may not need anything more than just a title and date to get your message across. For most events, though, adding things like an image and additional details can really make your event shine.
Event statuses: Live, Hidden, Planned, and Archived

- Live events are published and available via the front-end calendar, search results, and the API. By default, all events are set to Live. (There are more fine-tuned Privacy Options below.)
- Hidden events are never shown to the public, and are thus useful for events you’re working on but aren’t ready to promote yet.
- Planned events, like Hidden events, are not shown to the public. But, you can schedule a Planned event to go Live at any future date and time.
You can also Archive events. Archived items won’t show up on the front-end by default, though you can configure site-wide or specific views/widgets to include them. Most calendar users don’t bother archiving past events, since the calendar and feeds focus on upcoming events already.
Images
A good image can transform your event listing into a powerful marketing tool. The best images are:
- ✅ Large and high-quality: LiveWhale doesn’t require a specific image size. It will automatically crop and resize whatever you upload for different contexts. We recommend at least 200x200 pixels, but the bigger the better. Choosing an image that looks good at multiple sizes is ideal.
- ✅ JPG, PNG, or non-animated GIF format
- ❌ Not pictures of text: Images of text—like your event flyer or poster—usually don’t look good when cropped and resized for the web. Furthermore, that text needs to be available either in the caption/ALT text or in the body of your event for people using screen-readers.
Adding or selecting an image

With the image window open, the right-hand panel shows images that have already been added to your group (or other shared images). You can select one of those images to add to your event by clicking on it; click it again to remove it from the list. You can also use the “Upload image” button to add a new image to your library.

Once you’ve selected an image, a square thumbnail preview will appear at the top of the image editor. You can use the crop tool to select the square thumbnail image that will be shown in event lists. The full image will still be shown on the event details page.
More image options
You can add multiple images to an event—this will show a photo gallery style on the event details view. The first image appears as normal in the event sidebar, but when clicked it opens a fullscreen gallery that visitors can navigate using the arrows or their keyboard.

Click the above image to see a working example of the fullscreen gallery.
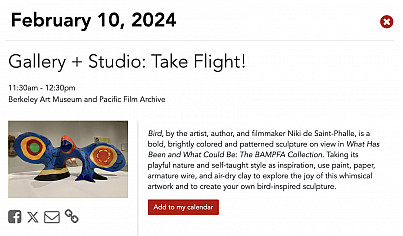
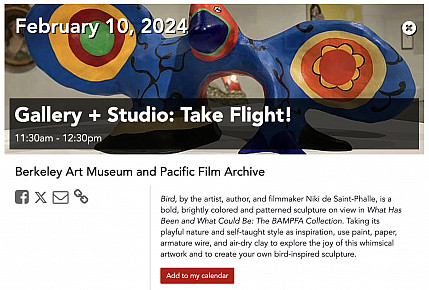
You can also check “Use first image as hero” to change the layout of your event details view. This works best with large, simpler images that work well having text placed on top of them.
Normal image layout
Hero image layout
Additionally, a default image can be added per group—for example, your Athletics group events you might want to include just your athletics logo for each event. That can be done in the Groups manager, and there’s more info on that in our docs.
More in the docs:
Featured and Shared Content
Tapping the “Featured event” star marks your event as featured, and may be shown in “upcoming featured event” lists on the public calendar. You can also setup widgets or API feeds to pull only starred events.
Tapping the globe marks your event as shared which allows borrowing and reuse of this event by other groups and content managers. Clicking “Shared Events” from the navigation shows you events shared from other groups this way.

Date and Time
Remember that date is a requirement, but you don’t necessarily need to include a time. Check “All Day” for events that are in fact all-day events, or it will automatically be chosen when you leave the time field empty. When your cursor is in the time field, a time-picker will pop up with options for every half-hour from 6:00am–11:30pm, but you can also manually type any time (12:00am, 3:15pm, etc.) into that field.
You may set an ending date and/or time by tapping the appropriate checkbox. There are repeating options for daily, weekly, monthly, and yearly events, with a range of options for getting more specific. Need to create an event for the Biology Club that’s every month on a Tuesday afternoon? We’ve got you covered.
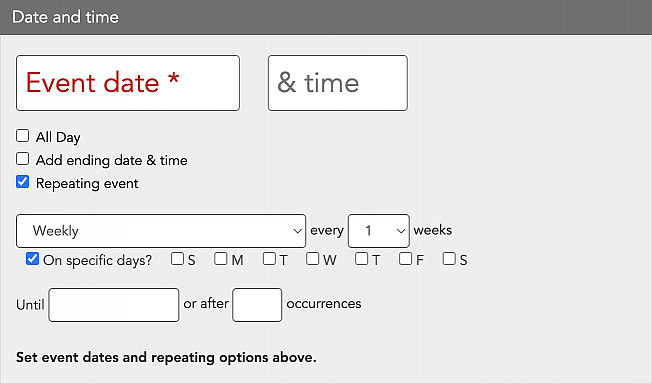
Tip: The “Weekly” repeating option also has the option to select specific days, in case your event repeats on Mondays, Tuesdays, and Fridays only.
Currently, repeating events must occur at the same time on each date in the series. If you have an irregular repeating event—say, a show that occurs Friday at 7pm, Saturday at 2pm and 8pm, and Sunday at 2pm—you’ll need to enter those as separate events, but you can link them together using Tags.
Summary
The summary field can appear in the calendar list view, API results, and widgets. It also appears on top of the event details view, usually in a slightly larger font. We recommend using the first sentence or two of your event description for the summary. This will appear “above the fold” and entice visitors to click through to view more event details.
Online Events
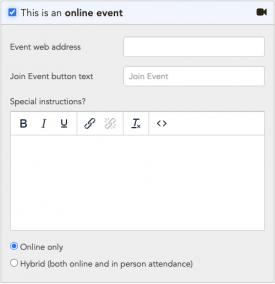
This is the place to put your webinar or online registration link, and it will be styled as a special button on the event details view.
“Online only” and “Hybrid” are event categories that get included in hidden Google JSON-LD markup for search, but doesn’t have any effect on the front-end display of your event.
Event Types and Tags
Event types are broad, top-level categories for your events. When thinking about event types, keep in mind they should be general enough to be applied to all calendar groups. For example, “Performances” would be a great type because it’s fitting to many groups, such as arts, music, theatre, student life, etc…We start you off with some general event types but your calendar administrators can edit them or add more.
Tags are descriptive keywords that help categorize your event. Tags are often used with event widgets— to create a list for a specific subset of your events— so you should think of tags as an additional organizing tool for your calendar. Depending on your theming, they may appear in your sidebar filters, your event details view, or may only be used for filtering widgets and API requests.
We sometimes say tags can be “as useful or as useless” as you want. Generally, if tags don’t appear in your event details view, or if you haven’t already decided to pull a list of tagged events in some other context, you don’t necessarily need to worry about adding tags to your events.
More in the docs:
Locations and mapping
Adding a location can be done on the fly for an event, or you can choose from already saved locations. Simply start typing in the locations box and a list of matching locations will appear.
Saved locations can be added globally or locally within a group. Global locations are a great way to enter all campus locations for your editors to reference. This prevents common areas from being duplicated and resulting in consistent naming. Locally entered locations in each group is best suited for venues that are specific for a department or off-campus locations that are not widely used.
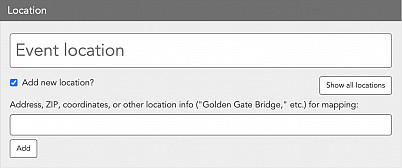
When creating a new location, start by searching for an address to load a map view. Then, drag-and-drop the map pin to the precise location you want—we know the physical address doesn’t always correspond to the actual building!
After adding a location to your event, you can then edit the Location’s display text on a per-event basis to include a room number or additional info. Some schools also elect to add a Custom Field for “Room Number” if they want that data separate in their designs.
More in the docs:
Event Details
Here you can include all of the rest of the information about your event. Enter an event description of any length. Several text formatting tools are available, and you can add images and videos to the event description as well.
Alternatively, you can choose to link to another site for event information. If selected, the link on your calendar or event widget will lead not to a calendar details view, but to the link entered here instead.
Contact Information and Event Cost
Contact information is optional but definitely useful for people wanting more information about your events. If you always use the same contact info on your events, default contact info can be stored in your group settings (your calendar administrator can add that).
If there is an event cost it can be entered here if you choose. Note: We don’t offer automatic integrated payments within LiveWhale. Payment gateway options can be discussed with our team if you’re interested. Most schools prefer to add a Custom Field for “Registration Link” and link out to EventBrite, etc. for events that require paid tickets.
RSVPs
LiveWhale Calendar includes full-featured event registrations, including setting open/close dates for RSVPs, limiting the number of attendees and registrations per email, custom email notifications, and more. Check out our documentation for more information about how to customize your event RSVPs.
More in the docs:
Privacy Options
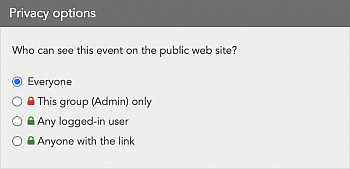
We recommend using the “Everyone” privacy setting for all of your events. Events with any setting other than “Everyone” will not show up in search, API results, or widgets by default. If you do want to limit certain events to logged-in users, make sure that your theming includes a way for them to login using Login Links.
Sharing Events
Sharing is one of the fundamental features of LiveWhale. By sharing your events with other LiveWhale Calendar groups, you can promote your events in more places, to more people. There are a lot of ways sharing and reusing content is encouraged on the LiveWhale platform, but the most central kind of sharing is between calendar groups.
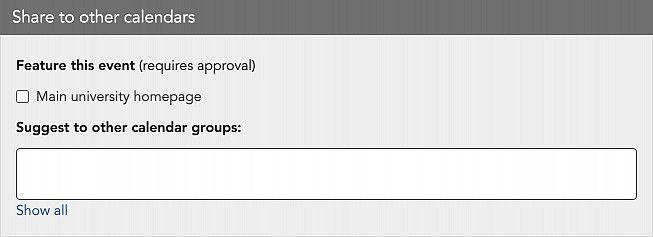
To suggest an event to another group, begin typing the name of the group in the suggestion field. The group should pop up as an option; if not, select “Show all groups” and select the group(s) you’d like to suggest your event to.

The “Auto accept as live” checkbox will bypass the approval process, and is only available to administrators or calendar managers with access to multiple groups, and are therefore able to share events between their own groups without extra approval.
The most common use of suggesting is for calendar users to submit events for promotion to a special group for featured events. Approved events from that group can be shown on the college homepage or the main campus calendar. If you have a specific calendar that will be used in this way, we have a plugin called suggest_to that will let you create a custom checkbox for suggesting to one of your groups:
Managing suggested events
When an event is suggested to your group, any managers in your group who have email enabled will be notified. The suggestions will also appear in a blue callout above your events list:
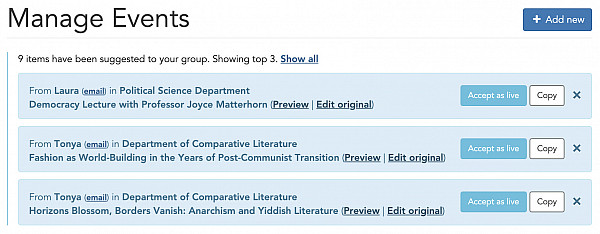
For each suggestion, you can:
- Preview the event on the front-end.
- Edit the original event if you have permissions to do so.
- Accept as live creates a linked copy, cross-listing the event from the suggesting group to your group. You’ll be able to edit the above-the-fold details (title, image, tags) to best fit your audience, but the original event and its details will still be managed by the original group. This is the most common action taken for shared events.
- Copy creates your own independent copy of the suggested event, which won’t be kept in sync with changes to the original. (Some schools choose to hide the “Copy” button to avoid confusion.)
Syncing external data with Linked Calendars
One of LiveWhale’s most powerful features is its ability to include events from all the calendars you already use. Events from your other calendars—no matter the source—sync automatically and invisibly with LiveWhale Calendar, and are integrated seamlessly with the other events on your calendar.
You can use the Linked Calendars feature to sync with external calendars, or to do a one-time data transfer by adding the feed, then deleting it, but choosing to keep all events.
- ✅ When setting up a Linked Calendar feed, all you’ll need is the iCal (.ics) URL of the calendar feed.
- ⚠️ We suggest avoiding RSS feeds, as they often don’t match up event data perfectly. If RSS is all you have, some custom code might help match it up better with the LiveWhale event fields.
- 📝 After pasting your feed URL into LiveWhale, you can override fields on a per-feed or per-event basis to get your events looking great with the minimal amount of work.
- 🖼️ Most iCal feeds don’t include images, for instance, so setting a default image for your Linked Calendar will ensure it gets added to all incoming events from that feed.
Event Submission Form
LiveWhale comes with functionality that allows visitors to your website to suggest Hidden events to the calendar. We often call this the “public” submission form, but most schools put this behind their single-sign-on (SSO) login, so only existing community members can submit events.
Submitted events come in for approval in one of two ways:
- All submitted events can be funneled into a special “Public” group in the back-end to review, edit, and publish when ready. You can choose individuals to be notified via email when submissions are made.
- Or, you can let the event creator choose which group to submit to via a drop-down selector. Then, publishers in that group will be notified when there is a new submission for them to review.
We start you off with an default form, but the possible customizations are endless! More information about choices surrounding the submission form can be found in the docs.
 LiveWhale Support